
Why Checking Your Attic Insulation Matters
Many homeowners don’t think about their attic until a problem arises—drafts in the winter, sky-high energy bills, or sweltering summer heat. But attic insulation is one of the most critical factors in home efficiency. If your attic is under-insulated, you’re likely wasting hundreds of dollars each year while dealing with uneven comfort across your home. A simple inspection can reveal whether you need more insulation. This checklist will guide you through what to look for, how to evaluate your attic’s condition, and when it’s time to call a professional.
Step 1: Look for Visible Joists or Rafters
One of the easiest signs that your attic is under-insulated is whether you can see the wooden joists or rafters on the floor. In most cases, insulation should cover these beams completely. If the insulation is level or below the joists, that’s a strong indication you need more.
Why This Matters
Insulation works best when it forms a continuous, thick barrier. Gaps or low spots allow heat to escape in winter and enter in summer. Exposed joists often mean the insulation depth is well below recommended levels.
Step 2: Measure Insulation Depth
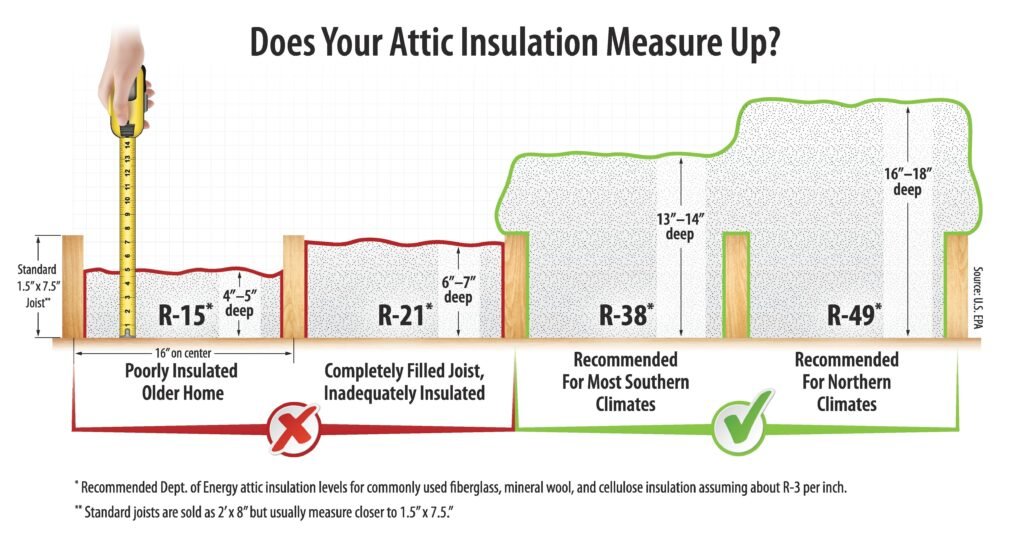
Different types of insulation have different recommended thicknesses. For example, the U.S. Department of Energy recommends attic insulation levels of R-38 to R-60 in most regions, which usually translates to 10–14 inches of fiberglass or cellulose.
How to Check
Grab a ruler or tape measure and check the depth at several points in your attic. If it measures less than the recommended level for your climate zone, you’re losing efficiency.
Step 3: Check for Uneven Coverage
Insulation should be evenly distributed across the attic floor. Look for areas where insulation is thin, missing, or disturbed. Common problem spots include edges near the eaves, around attic hatches, and near ducts or pipes.
Why This Happens
Air movement, pests, water damage, or even previous improper installation can cause insulation to shift or compress over time. Uneven coverage creates weak spots in your thermal barrier, leading to drafts and hot or cold rooms.
Step 4: Look for Signs of Moisture
Moisture in your attic is a red flag. It can come from roof leaks, poor ventilation, or condensation. Signs include damp insulation, water stains, mold, or a musty odor.
Why Moisture is a Problem
Wet insulation loses its effectiveness and can foster mold growth. Over time, moisture can also damage your roof structure. If you notice damp insulation, it’s often best to replace it and address the underlying moisture issue before adding new material.
Step 5: Feel for Drafts and Temperature Fluctuations
If certain rooms in your home feel drafty in the winter or excessively hot in the summer, your attic may not be properly insulated. Uneven temperatures between floors are another indicator.
Real-World Example
Imagine your upstairs bedrooms are always uncomfortably hot while your downstairs living room feels fine. That’s often a direct result of attic insulation issues.
Step 6: Check Your Energy Bills
A less obvious but important sign of poor insulation is steadily increasing energy bills. If your costs seem high compared to neighbors with similar homes, or if they spike seasonally, your attic may be the culprit.
Why Energy Bills Reflect Insulation Levels
When insulation is lacking, your HVAC system has to run longer to maintain comfortable temperatures. This increased demand directly translates into higher utility costs.
Step 7: Watch for Ice Dams in Winter
In cold climates, ice dams are a major sign of poor attic insulation. They form when heat escapes through the roof, melting snow that then refreezes at the edges.
The Danger of Ice Dams
Ice dams can damage your roof, gutters, and interior ceilings. They’re often a symptom of inadequate insulation combined with poor ventilation.
Step 8: Pay Attention to Indoor Air Quality
Attics with poor insulation and sealing can allow dust, allergens, and outdoor pollutants to enter your home. If your home feels dustier than usual or family members experience worsening allergies, insulation gaps might be partly to blame.
Step 9: Consider the Age of Your Insulation
Insulation doesn’t last forever. While fiberglass and cellulose can last decades under ideal conditions, older insulation may settle, compress, or degrade. If your home is 20–30 years old and hasn’t had new insulation added, it’s worth inspecting.
Step 10: Perform a Professional Energy Audit
While DIY checks are helpful, a professional energy audit provides the most accurate assessment. Using tools like thermal imaging cameras and blower door tests, energy professionals can pinpoint leaks, gaps, and insulation deficiencies that aren’t visible to the naked eye.
When to Upgrade Your Insulation
If your attic fails several items on this checklist, it’s time to take action. Adding blown-in insulation is one of the most cost-effective upgrades you can make. It quickly increases R-value, covers gaps, and creates an even barrier that reduces energy loss.
Why Blown-In Insulation Works Best for Upgrades
Blown-in cellulose or fiberglass can be installed over existing insulation (as long as it’s dry and in good condition). It fills voids, levels uneven areas, and provides comprehensive coverage without requiring major construction.
The Benefits of Taking Action
Upgrading your attic insulation offers benefits beyond just energy savings:
- Lower Utility Bills: Cut heating and cooling costs by up to 30%.
- Improved Comfort: Eliminate drafts and hot or cold spots.
- Longer HVAC Life: Reduce strain on your heating and cooling system.
- Higher Home Value: Energy-efficient homes are more attractive to buyers.
- Environmental Impact: Lower energy use reduces your carbon footprint.
DIY vs. Professional Installation
Some homeowners attempt to add insulation themselves, but professional installation ensures even coverage and proper depth. Professionals also handle safety issues such as ensuring ventilation isn’t blocked and sealing air leaks before installation.
Conclusion
Your attic may not be the most glamorous part of your home, but it plays a vital role in energy efficiency and comfort. By using this checklist, you can quickly determine whether your attic needs more insulation. Visible joists, uneven coverage, moisture problems, rising energy bills, or ice dams are all strong indicators that it’s time to take action. Adding blown-in insulation is a smart investment that pays off in savings, comfort, and peace of mind. Don’t wait until another high bill arrives—inspect your attic today and ensure your home is properly protected.